How to Automatically Descale a 2014 or Newer Gaggia Brera
Newer models of the Gaggia Brera now have an automatic descaling cycle. This post will guide you through the process. To identify models with the new automatic cycle check the manufacture date inside the door. Models manufactured from mid 2013 and on utilize the automatic descaling cycle. These models may also be identified by the logo on the face of the machine. Older models have the Gaggia name above Brera on the logo. The newer models, with the automatic cycle, have the Brera name above Gaggia on the logo.
The process described in this video applies only to newer models of the Gaggia Brera. The automatic descaling cycle takes approximately one hour to complete and will require your attention from time to time during the process.
To begin, empty the drip tray and dreg drawer and replace.
You may use a Gaggia brand descaler, or you can use Urnex Full Circle or Dezcal descalers as well as Durgol Swiss Espresso Special decalcifier. All these products are available from Whole Latte Love. Prepare the descaling solution according to directions on the product. We’re using Gaggia descaler so we add it the water reservoir and fill the rest of the way with water.
Place large cups under the brew spout and steam spout to catch liquids expelled during descaling and rinsing. It may be necessary to empty and replace these cups from time to time as they fill up during descaling and rinsing.
Place the machine in Stand-By mode. Stand-By mode is indicated by a red light flashing around the front panel power button. To get into Stand-By mode the main power switch on the back of the machine must be on. If the machine is already on and ready to brew, push the power button on the front panel to enter Stand-By mode.
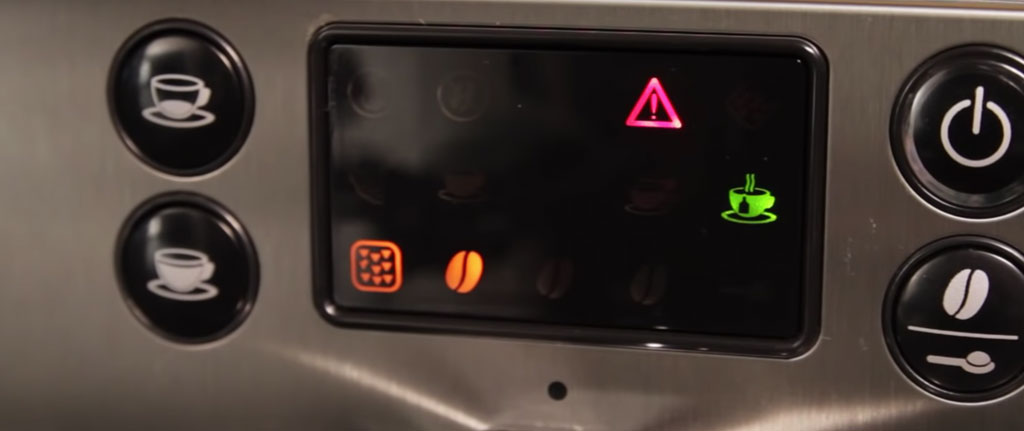
With the red light flashing, press and hold the small and large coffee sizes at the same time. This will flash the triangle symbol, and then the one bean light will be solid on while the descaling light will flash, indicating descaling has begun.
A small amount of liquid will dispense from the group head. The machine will sit idle for a full minute, and then dispense more. Some dripping from the group is normal. This process repeats until the reservoir is approximately half empty.
When the display changes to the hot water symbol and the flashing triangle, turn the selector dial to the right for the hot water function. Liquid now dispenses from the steam spout and then pauses. This process repeats a number of times. When complete, the triangle, small and large cup, one bean and descaling symbols will show in the display.

At this point, remove the water reservoir, rinse thoroughly and refill with clean fresh water. Empty the cups under the brew and steam spouts. Replace the filled water reservoir and the cups.
When the reservoir is replaced the priming symbol will be displayed indicated by the triangle and small cup icons. Prime the machine by turning the selector dial to the hot water function. When the water stops, turn the selector back to the center position.
Water will then dispense rapidly from the group head. Halfway through the rinse phase, the machine will display the hot water symbol. When the hot water symbol is displayed turn the selector dial to the hot water function. Rinse water now exits through the steam spout.
The machine may indicate you should refill the reservoir during this phase as many as two times. Water flow will stop from the steam wand. If it does, turn the selector dial back to the center position, refill the reservoir with clean water, replace and turn the selector dial back to the hot water function. The machine will then continue to rinse.
When rinsing is complete turn the selector back to the center position. The descaling symbol will disappear and the machine will return to the Stand-By mode. At this point descaling is complete
and the machine is ready for use.
We recommend descaling your machine every two to three months for normal use and more frequently for heavy use or for machines brewing with hard water. See Whole Latte Love for a complete selection of descaling products for your machine.
 Canada
